So I wanted to setup a home media server that was accessable from the web but securely. Here is my free approach to setting up an outside accessable media server that's encrypted. I did this all on a Raspberry Pi 3. The total cost of everything is as follows: Raspberry Pi 3 Start Kit $75 (https://www.amazon.com/gp/product/B01C6Q2GSY/ref=oh_aui_detailpage_o00_s00?ie=UTF8&psc=1) - Raspberry Pi 3 - 32 GB Micro SD Card - Power Cord - HDMI Cable - Raspberry Pi Case - USB to Micro SD Converter 500 GB External Hard Drive - $40 https://www.amazon.com/500GB-500G-Portable-External-Drive/dp/B01LYIWKLY/ref=sr_1_1?s=pc&ie=UTF8&qid=1481931391&sr=1-1&keywords=external+hard+drive&refinements=p_n_feature_two_browse-bin%3A562241011%7C562240011 Total: $115 order of events** Basic Plex Setup * SSH Only Access * Setup A Hostname * Router Setup * Get SSL Certs with LetsEncrypt (CertBot) * Setup A Reverse Proxy * Setup Dynamic DNS Client * Setup Automatic SSL Renewal with LetsEncrypt (CertBot) Basic Plex SetupFirst thing to do is to setup a plex media server. Simply follow all these setups and you will have just that. It won't be outside accessable but I will get into that later. 1. Go to https://www.plex.tv/ 2. Sign Up 3. Plug In and connect to your Raspberry Pi and run the following shell commands Now you have a plex media server running! Check it out by going to that ip address you wrote down /web SSH Only AccessTo enable ssh every single time you reboot your raspberry pi simply make a file called "ssh" and place it in /boot of your SD card. Open the prompt and run the following commands: Find where it says "SSH" and enable it Login as 'pi' and 'raspberry' or whatever username and password you have set You should definitly change the default password if you haven't Now generate a key that you will use to ssh into your server with Now copy your public and private key somewhere safe. Then proceed... Change #PasswordAuthentication yes -> PasswordAuthentication no Change Port 22 -> Port <Whatever SSH Port you want to use> Now before you just select a random port other than port 22 to use for SSHing into your server look at the common port map listings: https://en.wikipedia.org/wiki/List_of_TCP_and_UDP_port_numbers Choose one that isn't used (or you don't plan on using). With that setup try to SSH into your server without using your key. If it says "No logon servers" or some other related error thats a good sign. Now try to SSH using your key. It should prompt you for a password (If you used one while filling out the information while creating the key) or it will just log you on. Setup A HostnameFor me I use "NoIP" but there are many others. Another good one is "DuckDNS". For this I'm using No-IP. Create an account with No-IP: http://www.noip.com/ Login To the dashboard. On the side bar click "Dynamic DNS" Select "Hostnames" On that page click the button "Add Hostname" Fill that out and you now have a hostname (Note: This takes about 5 minutes to become active) If you go to this hostname now nothing will work since nothing has been setup yet, for outside access. Router SetupNow this isn't universal so I will only be able to give general instructions. First we need to make our server's IP not change (static). Get your "Default gateway" gateway by running ipconfig for windows or ifconfig for linux. Log into your default gateway (EX: 192.168.1.1) For me to setup a static IP I navigate to Advanced Setting > Lan > DHCP Server Then I input my MAC Address for my server and the IP that I want my server to have. Then I port forward 80 and 443 to that IP address:80 and 443 (respectively). To get specific's on how you can port forward for your specific router go to the following page and find your specific router: https://portforward.com/ Once everything is setup. Log into your server and reset your IP. It will pickup your new IP. Get SSL Certs with LetsEncrypt (Certbot)LetsEncrypt is free and their certs automatically work with all the major browsers. (Amazing!) Download and run their "CertBot" client to setup your certificates. This will try to get your certs over port 443, thats why we forwarded them before. Note that <hostname> should be replaced will all possible forms of your hostname. EX: -d example.com -d www.example.com If that worked then you should see the following message: Congratulations! Your certificate and chain have been saved at /etc/letsencrypt/live/<hostname>/fullchain.pem. Your cert will expire on 2017-03-13. To obtain a new or tweaked version of this certificate in the future, simply run certbot-auto again. To non-interactively renew *all* of your certificates, run "certbot-auto renew" - If you like Certbot, please consider supporting our work by: .... Yay! you now have certified certificates for your host! We just need to implement them. That's why we need to setup a reverse proxy. Setup A Reverse ProxyThe reason I had to use a reverse proxy is because getting an SSL cert for my plex page was impossible. It returns a redirect instead of a hostname, therefore getting and SSL with letsencrypt for it was impossible. This is a workaround way that will work. Run the following commands to install "Nginx" With this file open add the following. Please note that anything in "<>" will need to be replaced with your own content(Hopefully that makes sense): With this setup run the final commands to finish your reverse proxy setup: If this returns "ok" s then your good to go! Otherwise you will need to resolve the errors that occure. Now restart ngnix and your done! If everything was done correctly you should be able to navigate to https://<hostname> and it will pull up a SSL secured version of your plex media server! Lets just make sure that ngnix will start automatically during every boot: Setup Dynamic DNS ClientNow everything is working lets make sure it stays that way. This will map your servers local IP to your public IP whenever your public IP changes. Run the following commands to download and install No-IP.com's DynDNS client: Fill out the questions: <No-IP username> <No-IP password> Everything Updated? - No <Select Hostname to keep updated> update interval - 5 run something on success? - No With those answered start the client as a background process Just like that you now have a permanently available Plex Media server on the web that is encrypted. The other nice thing is that you can SSH to your server from anywhere on the web securely. The only way to access it is through your Key. That means no one is going to guess your password because they have to have a physical file. Automatic SSL Renewal with LetsEncrypt (CertBot)Certs expire every 90 days but can be renewed at the 60 day mark. First test a manual renewal to see how it works. In order to have this work though you need to stop nginx since it takes port 443 which certbot will need to use. If that worked you should be presented with something that looks like the following: Now setup cron to run the job every week to automatically keep these certs up to date. Note: This cron job must be run as root so login as root prior to editing the cron job. The above cron job will run every Sunday at 3 AM. If your certs need to be renewed then it will renew your certs for you and save it to /etc/letsencrypt/live/<hostname>/... otherwise nothing will happen other than restarting your nginx server. Note: Since you setup your nginx to look for the certs at the location certbot renews to it will automatically pickup your new certs! Yay! Otherwise you will need to implement other code to move that cert file to its needed location. Here is an example:
0 Comments
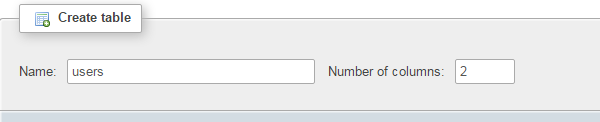
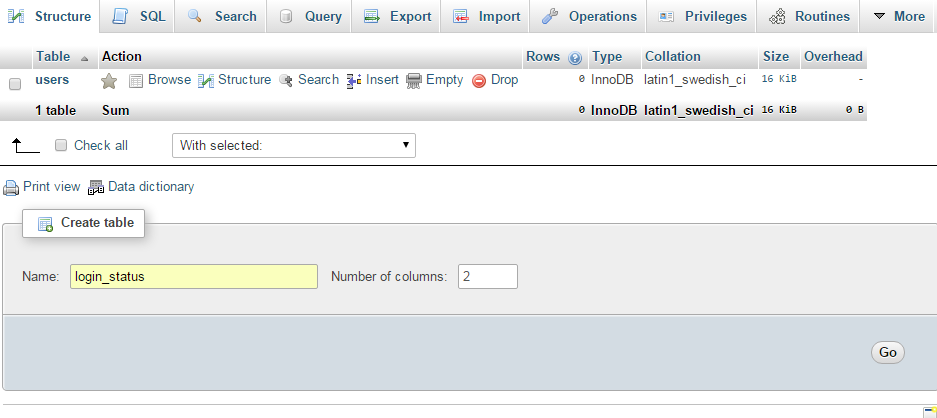
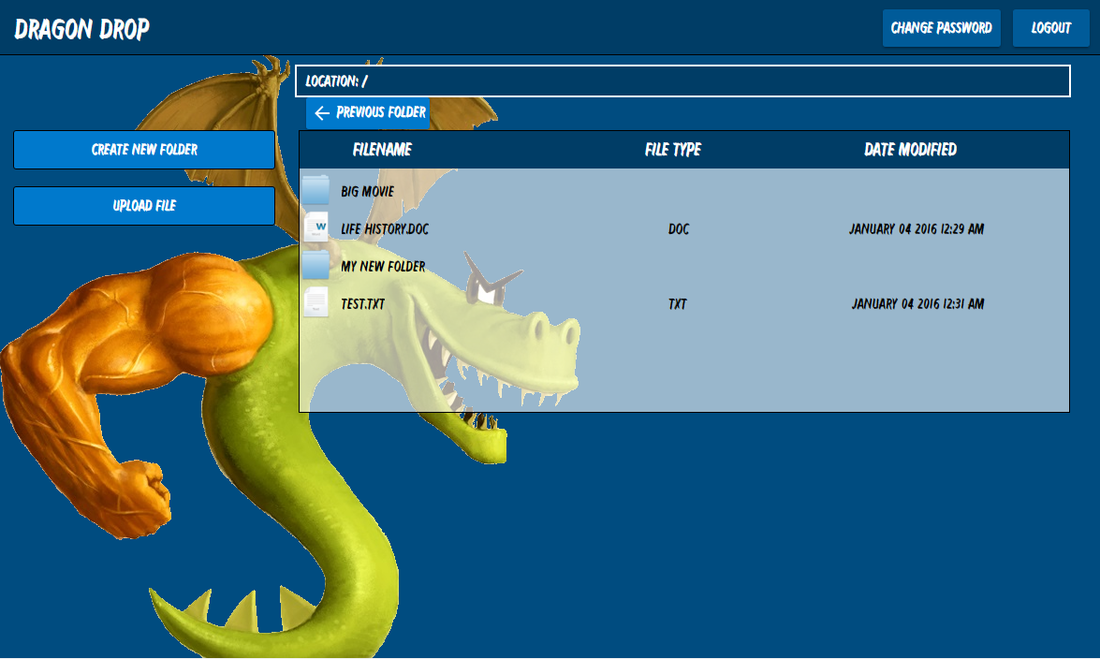 The RequirementsThe idea here is to make a free alternative to Dropbox but essentially have unlimited space to store files for online access. I have a long list of code that I am giving away to you to use, free of charge! That's right it doesn't get better than this. Here is a list of programs that I used in order to get this all working: XAMPP No-IP My Code --Found on the top right of this page (currently incomplete but there is already a lot of cool functionality in it) Here are the steps that you will need to go through in order to get everything working. I will be going into depth about each of these topics: 1. Setup XAMPP (Special setups required for my code) 2. Allow outside web access 3. Securing those connections Setup XAMPP Part 1/3 -- MySQL Database Setup 1. First download XAMPP (PHP version 5.6) 2. Click next through the setup. The picture below are the essential install requirements to get everything working. 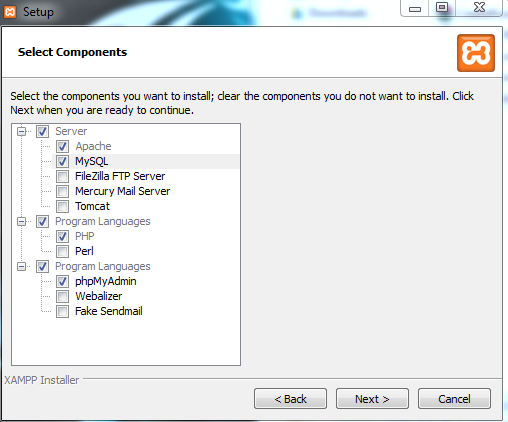 3. When it asks at the end of the install start the control panel. 4. Click start on both "Apache" and "MySQL" 5. Click the "Admin" button on MySQL -- this will open the following webpage: 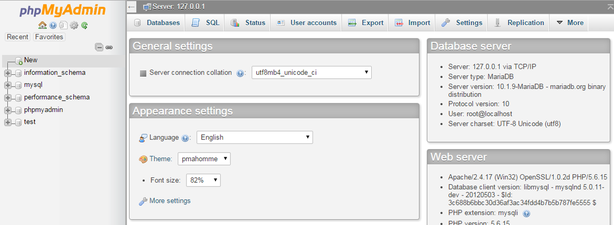 6. Click on User accounts 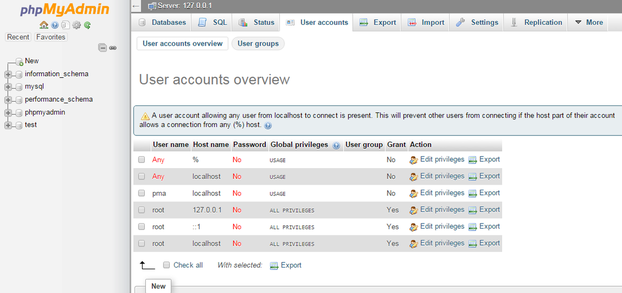 7. Click Add New User a. This user will be your new administrative user for any future changes b. For this example I made a user called "setup" 8. To make things easy for now give this user all privilages 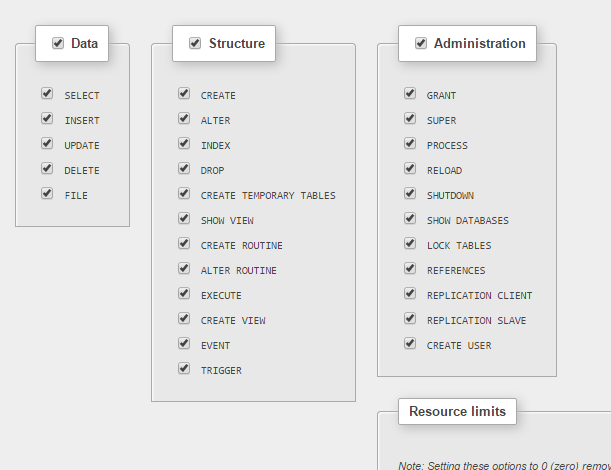 I would suggest making this user a little more limited but for first time users this will be okay for now. 9. Now you should see your user added. 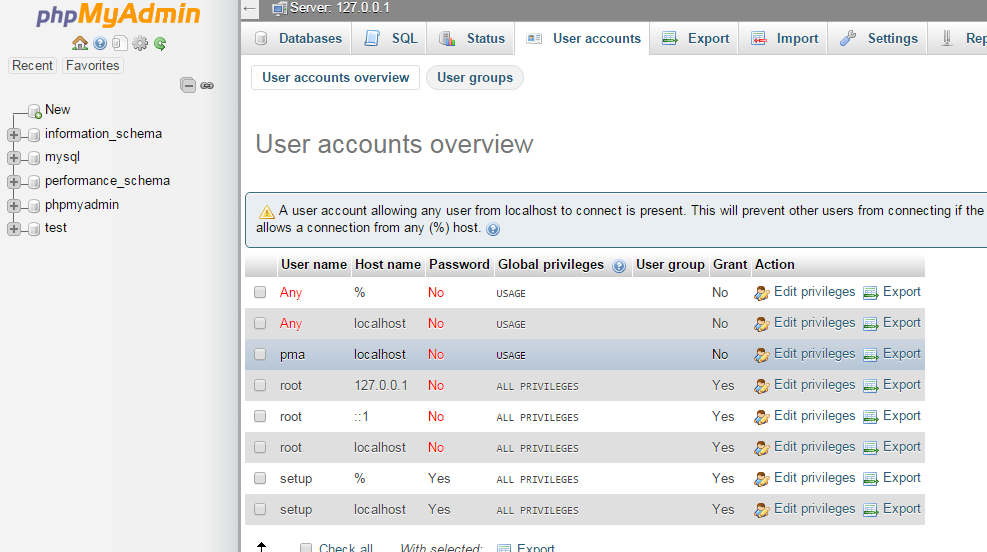 10. Do the same thing but this time make a "generic user except only give him the following rights(this is important its part of my code) -- this user and password also need to be added into the connection.php file found in dropFilesBacked/protected/config/connection.php  11. When you are done a new generic user should be part of this list 12. Now open a windows file explorer and navigate to C:\xampp\phpMyAdmin\config.inc.php a. Open this with notepad or something equivalent (For this example I'm using Notepad++) 13. Navigate to where it says "$cfg['Servers'][$i]['user'] = 'root'" and change that to the administrative user you just made a. In this example it is "setup" for me 14. Do the same for the password -- enter the password you used to make the administrative account. 15. There is also a line that is commented out that says "User for advanced features" change the username and password to the same one you used previously. 16. When done it should look similar to this: 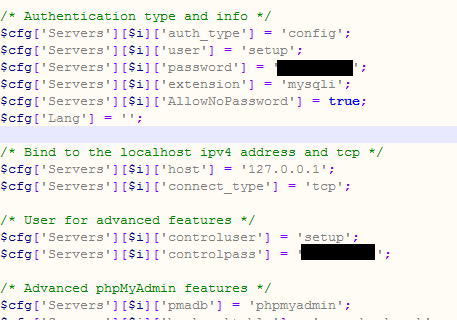 -- noticed one mistake here in the it says to not allow a password. I will have to change this to 'false' and see what happens but if you don't want to mess around with that then just leave it 'true'. 17. Go back to the MySQL Admin and delete all of the users except the two that you made. When done it should look similar to this: 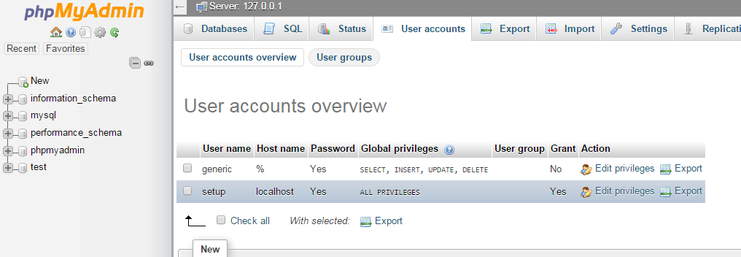 18. Awesome! Now lets setup a database that my code will use. Click "New" on the left side of the page and create a database called "files_db".  19. Now create two tables in this database. One called "users" and the other called "login_status".
20. Setup the users table like the following: 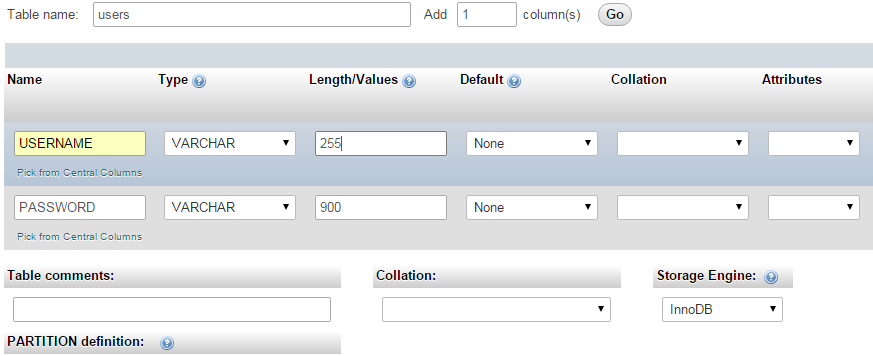  21. Setup the "login_status" table like the following: 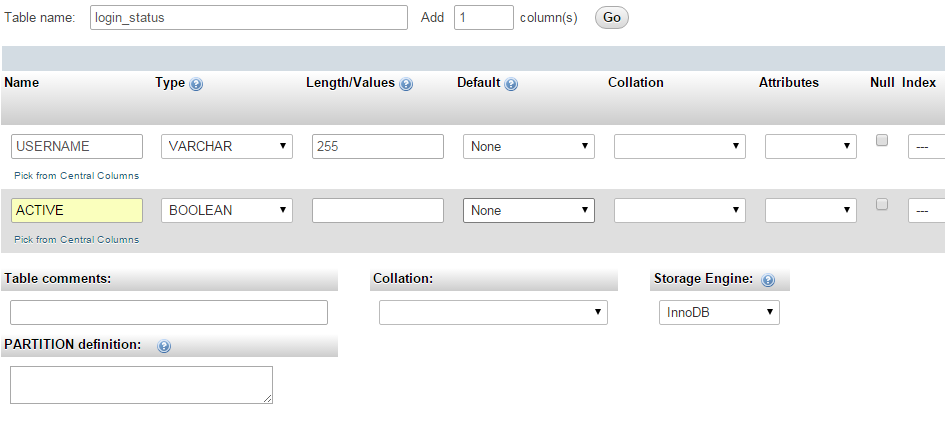 PHEW! Well you have done it. for the MySQL setup. Great Job! I know it was a lot of work but you are well on your way. Part 2/3 -- Apache Web Server Setup Now that a MySQL Database is done lets move onto setting things up with Apache. 1. On the XAMPP Control panel click the "Config" button with Apache and select "php.ini" 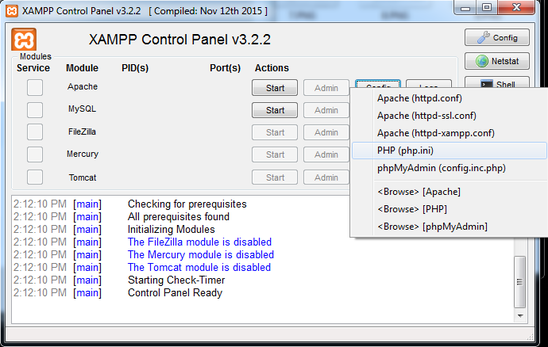 2. Change all of the following lines to match the pictures 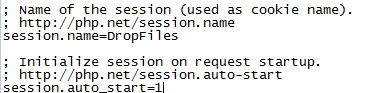  3. The above will help to make my code work the way it should. The following changes will be related more towards the security of your website. Open XAMPP control panel -> config, this time click "httpd.conf" 4. Make all of the changes shown in the pictures 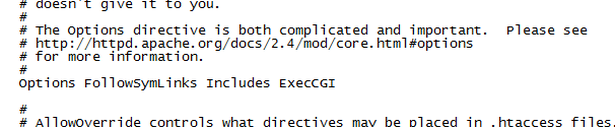 5. Save the file and close it. 6. Navigate to C:\xampp\htdocs 7. Delete EVERYTHING inside it. 8. Copy the code I gave you into this folder (There are "dropFiles" and a "dropFileBackend" folders) 9. Go To the XAMPP control panel and click "Start" on Apache & MySQL 10. Open a Web Browser and type "localhost" 11. If you setup everything correctly you should be greeted by this screen: 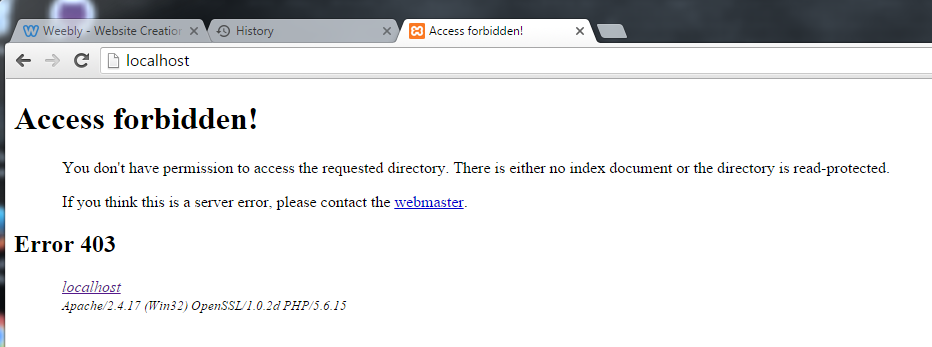 12. If you got that then great! Now make sure you copied everything over good by typing in "localhost/dropfiles" in your browser. If everything was copied over good then you should be presented with the following screen:  13. If you get this then your Apache setup is now complete YAY! The next step is to setup a personal user that can access your protected files. Part 3/3 -- Setting Up Personal Users 1. Open the XAMPP control panel 2. Click Start on MySQL then click the Admin button 3. Navigate to files_db database and the users table 4. Click the "SQL" button 5. Now before we continue we have to generate a password. This can be done by starting your Apache server and navigating to the following URL (replace "<PASSWORD>" with the password you want to log in with). localhost/dropfilesBackend/index.php/main/ReturnHash?PASSWORD=<PASSWORD> 6. The output show show a jumbled mess of letters and numbers:  7. Copy this mess and go back to your MySQL page SQL Tab. Then input the following SQL statement (Replace "<USERNAME>" with the username you want to log in with and "<PASSWORD>" with the copied hash (that jumbled mess of letters and numbers) ). INSERT INTO `users`(`USERNAME`, `PASSWORD`) VALUES ('<USERNAME>','<PASSWORD>') 8. An example below shows you what you should be seeing. 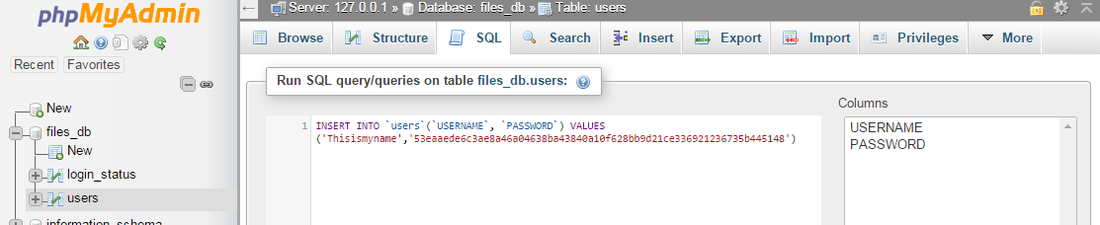 9. Now click the go button on the bottom right corner of the page. If everything worked then it should present you with a green box saying it was successful. If not fix the problems it tells you it has.
10. Now go to your users table and verify that you see the new user and hashed password. 11. Final step make a folder named the same thing as your username in dropFilesBackend/FILES/<USERNAME> 12. DONE! Do this for every user that you want. When done it is highly suggested that you comment out that section of code in the dropFilesBackend that produces these hashed passwords. Continue on to part 2 "Allow Outside Web Access" Part 2 - Allow Outside Web Access |
ArchivesCategories
|
||||||
 RSS Feed
